Google Search

Tuesday, September 23, 2014

OIM Self Service Portal Customization


OIM Self Service Portal UI:

Oracle Identity Manager 11gR2 Self Service Portal UI. You can personalize this Panel/Widget.
At the top left side you’ll see a button when you can personalize.


Once personalize button is submitted you can click on the Add content to include a new panel.


The screen below display the out of the box Panel available to display on your Oracle Identity Manager 11gR2 Self Service home page.


Also you can customize each one of this panel. Click on the top right button on the panel to see more options.


On the next panel customization you can modify the name of the portlet, assign color, define your own style etc.
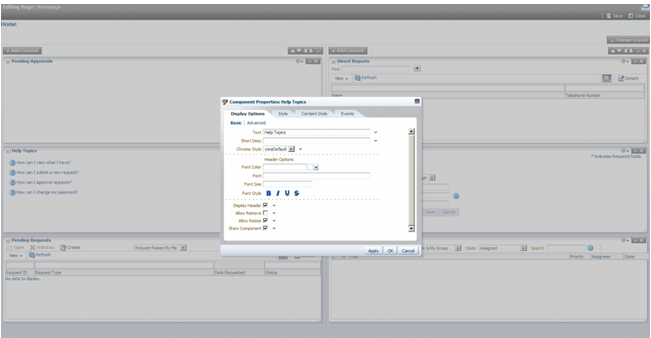

Finally on your top right side you can also modify the layout for the panels.


Tuesday, September 16, 2014

How to Re-configure Webgate

Go to C:\>cd Webgate_Install_Directory\NetPoint\Webgate\access\oblix\tools\configureWebGate

C:\Webgate_Install_Diretory\NetPoint\Webgate\access\oblix\tools\configureWebGate>configureWebGate.exe -t WebGate -i C:\Webgate_Install_Directory\NetPoint\Webgate\access

 Please enter the Mode in which you want the Web Gate to run : 1(Open) 2(Simple)  3(Cert) :Enter which mode you want to configure

 Please enter the Web Gate ID : Provide Web Gate ID which is configured in the Application Domains of OAM Administration Console

 Please enter the Password for this Web Gate :Provide the password

 Please enter the Access Server ID : OAM_SERVER1

 Please enter the Access Server Host Machine Name : Provide OAM server host-name

 Please enter the Access Server Port : 5575

 Preparing to connect to Access Server.  Please wait.

 Web Gate installed Successfully.

 Press enter key to continue ...

The above steps completes the Webgate re-configuration part on Web-server machine where web Gate is installed.

Restart IIS server.

Enable/Disable WebGate plug-in on Apache

1. Take a backup of httpd.conf from Apache installation directory

2. Edit the file. Add the following sections in end of the file to ENABLE it and Save.

3. Edit the file. Remove the following sections in end of the file to DISABLE WebGate plug-in and Save.

#*** BEGIN WebGate Specific ****

<IfModule mod_ssl.c>
LoadModule obWebgateModule "E:\ApacheWebGate\NetPoint\WebComponent\access\oblix\apps\webgate\bin\webgatessl.dll"
WebGateInstalldir "E:\ApacheWebGate\NetPoint\WebComponent\access"
WebGateMode PEER
</IfModule>

<IfModule !mod_ssl.c>
LoadModule obWebgateModule "E:\ApacheWebGate\NetPoint\WebComponent\access\oblix\apps\webgate\bin\webgate.dll"
WebGateInstalldir "E:\ApacheWebGate\NetPoint\WebComponent\access"
WebGateMode PEER
</IfModule>

<Location /access/oblix/apps/webgate/bin/webgate.cgi>
SetHandler obwebgateerr
</Location>

<Location "/oberr.cgi">
SetHandler obwebgateerr
</Location>

<LocationMatch "/*">
AuthType Oblix
require valid-user
</LocationMatch>

#*** END WebGate Specific ****

Enable or Disable WebGate Plug-In on IIS 7.5

1.    Go To Internet Service Manager.
2.    Expand the local computer by clicking +, in the left panel.
3.    Click to expand the required Web Sites tab.
4.    Right-click Web Sites in the Internet Information Services tab, click Properties, and perform the following steps:
a.    From the Internet Information Services tab, click the Edit button.
b.    Locate the ISAPI filter tab to confirm (or add) the filter DLLs, as follows:

Filter: If you updated the IIS Web server configuration file, webgate.dll should be properly located. –

Disable : Stop IIS, remove the existing WebGate entry and Start the IIS for changes to take effect

Enable : Stop and Add the WebGate entry as follows and Restart the IIS for changes to take effect

No Filter: Add the webgate.dll filter from Webgate_install_dir\oblix\access\apps\webgate\bin\webgate.dll

E.g: OracleWebGate - Webgate_install_dir\oblix\access\apps\webgate\bin\webgate.dll
c.    Save and apply any changes.

Tuesday, September 9, 2014

Lost Weblogic Password Reset


Steps to Reset WebLogic password:

1.       Set MW_HOME and DOMAIN_HOME

2.       Go to $DOMAIN_HOME/bin -> ./setDoaminEnv.sh (linux) // setDomainEnv.cmd (Windows)

3.       mv $DOMAIN_HOME/servers/AdminServer/data $DOMAIN_HOME/servers/AdminServer/data-old

a.       <Middleware_Home>\user_projects\domains\base_domain\servers\AdminServer\data\ldap as it will get recreated once the WebLogic Admin server starts.

4.       set CLASSPATH as well. Ex: export CLASSPATH=$WLS_HOME/server/lib/weblogic.jar

5.       Go to $DOAMIN/security

6.       mv DefaultAuthenticatorInit.ldift DefaultAuthenticatorInit_old.ldift

7.       $java weblogic.security.utils.AdminAccount <weblogic> <Newpassword> . (If java path is not set, then try to provide java full path location like /app/java/jdk1.6/bin/java etc…)

8.       $DOMAIN_HOME/servers/AdminServer/security/boot.properties (If you want to set the boot.properties)

a.       Username=weblogic
b.      Password=Newpassword

9.       $DOMAIN_HOME/bin -> ./startWebLogic.sh (Linux) // startWebLogic.cmd (Windows)