Google Search

Tuesday, September 23, 2014

How to convert .cer file into cert8.db?

Problem:

How to convert .cer file certificate into cert8.db certificate?

Solution:

1. If you have already exported .cer file, it will not directly convert .cer to cert8.db format.
2. So instead of directly converting, simply convert that .cer into .pk12 and then, use certutil command to import .pk12 to cert8.db extension

For more information regarding converting .pk7 to .cer extension, please read the below url;

http://maniidm.blogspot.in/2014/09/how-do-i-convert-pkcs-7-certificate.html

How do I convert a PKCS 7 certificate file to x.509 certificate file?


Problem:

Certificate file in email is PKCS 7 format and server certificate installation instructions requires x.509 format.

Resolution:

To convert the PKCS 7 formatted cert.cer file to x.509 format perform the following steps.
  1. Copy the PKCS 7 certificate file to a Windows desktop
  2. Rename the file and give it a .p7b extension
  3. Open the .p7b file
  4. Click the plus ( + ) symbol
  5. Click the Certificates directory
    Note: If an EV certificate is being converted your should see three files. The End Entity certificate and the two EV intermediate CA's.
  6. Right click on your certificate file
  7. Select All Tasks > Export
  8. Click Next
  9. Select Base-64 encoded X.509 (.cer) > Click Next
  10. Browse to a location to store the file
  11. Enter a File name. For example MyCert. The .cer extension is added automatically.
  12. Click Save
  13. Click Next
  14. Click Save

Customizing Logo of Custom Height and Width in OIM 11g R2 PS2


Customizing Logo of Custom Height and Width in OIM 11g R2 PS2 

This post is about the logo customization in Oracle Identity Manager 11gR2PS2 (11.1.2.2). Oracle by default supports a logo of dimensions 119 * 27 pixels. If you have a logo of same dimensions then you can follow the steps as described in the Developer's guide. However, if your client has a logo image of bigger size you need to perform certain customization follow below steps:

Please note in this post, I will be talking about the logo of the dimension 172 * 99 pixels which is bigger than the oracle logo.

High Level Steps:

1. Configuring logo using Sandbox
2. Configuring the appropriate .jspx files

1) Configuring logo using Sandbox

a. Copy the idmXpress.png image file under the path
$ORACLE_HOME\server\apps\oim.ear\xlWebApp.war\images
$ORACLE_HOME\server\apps\oim.ear\iam-console-faces.war\images directory
      
b. Login to the OIM Identity console with xelsysadm or user with System Administrator privileges.


c. Click on the Sandbox link on the top right corner

d. Click on Create Sandbox button and provide a proper name to the sandbox and make sure that the Sandbox is Activate
                            

e. Click on the Customize link


 f. Click on View >> Source


g. Click on the Oracle logo image and click Edit 
                       
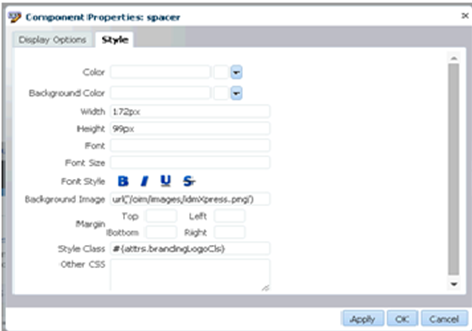
 h. In the new pop-up window enter the details as shown
     Display Options tab:
     Short Desc: IDM Express (Provide your own Name)                     
  Style tab:

       Width: 172px
       Height: 99px
       Background Image: url ('/oim/images/custom_logo.png')


i. Click Apply and OK to save the changes

j. Close the Customize window and Go to Sandbox link and publish the sandbox

2) Configuring the appropriate .jspx files:

a. Navigate to $ORACLE_HOME\server\apps directory
 

b. Extract the oracle.iam.console.identity.self-service.ear file and the war file oracle.iam.console.identity.self-service.war file
                                 
    
c. Under the oracle.iam.console.identity.self-service.war file navigate to \oracle\iam\ui\main as shown below


d. Open the appropriate .jspx file and change the value of the "globalHeader" parameter from 30 to 103(as width of the logo file is 99px)                          

e. Save the .jspx file and replace the existing self-service ear file

f. Repeat Step b - Step e for oracle.iam.console.identity.sysadmin.ear file                           


g. Restart all the servers including Admin server and make sure to remove the contents under the $DOMAIN_HOME\Servers\SERVER_NAME\tmp directory under the Admin Server and OIM managed Server

h. Your new logo should be visible on the identity and sysadmin console.

In case you are not able to see the new logo, delete your browser cache and cookies and restart the browser.

OIM Home Page Customization


The Home page provides you a snapshot of the various functions in the Oracle Identity Self Service. You can personalize the Home page by adding and removing containers, and rearranging containers..
When you add a container, you must add UI components to the container to use it. To add containers in the Home page and then add UI components:

Note:

The personalization capabilities, such as adding and removing containers and changing layouts, are not governed by authorization policies. However, the contents available to each user for adding is governed by authorization policies.
  1. Login to Oracle Identity Self Service, and navigate to the Home page.
  2. Click Personalize. The Home is displayed in customization mode with toolbars that consist of icons.
  3. Click the Add Box Above icon on the toolbar. Below Screen shows the Add Box Above icon on the toolbar.
The Add Box above Icon on the Toolbar
You can click the respective icons to add a box below, right, or left of the container in which you are clicking the icon.
After clicking the icon, a container is added to the Home page, as shown in below screen

A New Container

Click Add Content. 

The Add Content dialog box is displayed with the list of homepage task flows that you can add to the container. Below screen shows the Add Content dialog box.
The Add Content Dialog Box

  1. Select the homepage task flow, and click Add. Then, close the Add Content dialog box.
  2. Click Close on the navigation bar at the top to quit customization mode.