Google Search

Monday, July 27, 2015

How to Create Custom Scheduler Job in OIM 11g R2 PS2


Below are the high level steps to create a custom scheduler job in OIM:

      1.       Prepare a custom java code which extends TaskSupport
     2.       Make a Jar file
     3.       Prepare plugin.xml file
 
                          <?xml version="1.0" encoding="UTF-8"?>

<oimplugins xmlns:xsi="http://www.w3.org/2001/XMLSchema-instance">

    <plugins pluginpoint="oracle.iam.scheduler.vo.TaskSupport">

        <plugin pluginclass="com.test.iam.tasks. TestScheduledTask " version="1.0" name=" TestScheduledTask"/>

    </plugins>

</oimplugins>
      4.       Prepare <Classname>.xml file (Prepared as per your requirement)

                          <?xml version="1.0" encoding="UTF-8"?>

<scheduledTasks  xmlns="http://xmlns.oracle.com/oim/scheduler">

  <task>

    <name>Test Scheduled Task</name>

    <class> com.test.iam.tasks.TestScheduledTask</class>

    <description> Test Scheduled Task </description>

    <retry>1</retry>

    <parameters>

                                <string-param required="true" helpText="Input File"> Input File</string-param>

                                <string-param required="true" helpText="Delimeter">Delimeter</string-param>

   </parameters>

  </task>

</scheduledTasks>

       5.       Structure of this schedule task zip file :

                               a.       Lib/<classname.jar file>

                               b.      Plugin.xml

                              c.       META-INF/<classname.xml file>

                              d.      Create a <classname.zip> file

       6.       Move the created zip file into OIM server path ($OIM_HOME/Server/plugins)
      7.       Do Plugin Registration using “ant” utility (make sure you have set ant.properties file properly)
 
     8.       Verify plugin is successfully updated or not in OIM DB

                    Select * from plugins where NAME=’complete package name with class’;

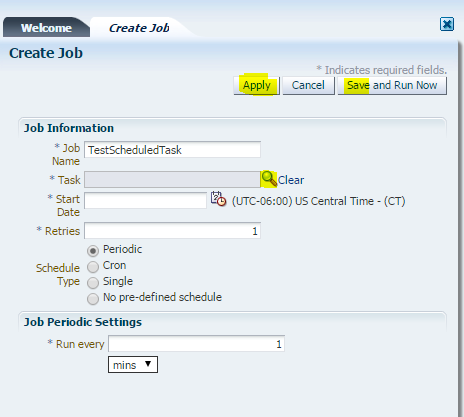
    9.       Create a custom schedule task in OIM by login into OIM system administration console


     10. Go to Scheduler under System Management


  11.       Click on Create new as shown below


   12.       Provide required details and select Task (which will be available with name provided inside scheduler xml file)
 

   13.       It will be shown up in Scheduled Tasks and Run that job.

Thursday, July 16, 2015

Disable Firewall in Redhat Linux 6.5

Login as root User,

1. Save the firewall setting using the following command :

[root@oracle ~]# service iptables save
 iptables: Saving firewall rules to /etc/sysconfig/iptables:[ OK ]

2. Stop iptables using the following command :

[root@oracle ~]# service iptables stop
 iptables: Flushing firewall rules: [ OK ]
 iptables: Setting chains to policy ACCEPT: filter [ OK ]
 iptables: Unloading modules: [ OK ]

3. Execute this chkconfig command :

[root@oracle ~]# chkconfig iptables off

Monday, July 13, 2015

OIM Flat File Connector Outline Steps

        This connector is the way to go while dealing with flat file trusted/target reconciliation and should be used instead of GTC as it done away with GTC wizard.

       It relies on schema File to manage and define the structure of data, primary key, and date key, multivalued data.

      You can manually edit the schema file (.properties) to declare fields and their properties.

       Data file sits separately on the server with the first line just containing the column header followed by records of data.

      You can load/reconcile users, accounts, roles, entitlements, connected/disconnected resource data etc. using this connector.

       You can create custom parsers for parsing data which is in other format than CSV.

       Delimiter, comment, multivalued data indicator characters are configurable.

       Flat File Header (column names in first line) can contain spaces to define column names. It need not be double quoted as it is not data.

       It supports Preprocess and Post process Handlers which can be handy for perform any job on the flat file directory, like zipping and unzipping files, encryption and decryption of the complete file dumps or specific fields in the files, virus scan of the files, or any other tasks limited only by the implementation of these tasks.

       Reconciliation of deleted records is supported.

       Connector comes OOTB groovy script which is easy to use to generate trusted/target or disconnected application specific metadata (OIM artifacts)

       Most of the configuration can be changed during runtime by modifying lookups, schema File and data File. Let’s say you add a new column then update the lookups then Schema File and then add the data in data file to get it working.

       Archiving by default moves the processed file to the folder specified and zips it with a time stamp value.

       In case of failure, file gets moved to a failed folder

       Transformation and data validation is also handled.

       This Connector can run on OIM machine or on a machine where Connector Server is running so this gives the additional flexibility of where to do all the processing.

OIM 11g R2 PS3 Installation Steps

OIM 11g R2 PS3 High-Level Installation Steps

1. Oracle Database Installation 11.2.0.1.0

2. RCU 11.1.1.9.0 Installation

3. Weblogic 10.3.6 Installation

4. SOA 11.1.1.9.0 Installation

5. IAM 11.1.2.3.0 Installation

6. Creating domain for IAM

7. Creating Database Security Store

8. Configuring OIM Server

9. Configure OIM Design Console


Complete installation steps with screenshots will be updated soon!

Tuesday, July 7, 2015

Entitlements not showing under Catalog in OIM 11G R2 PS2


For entitlements & App instances to show under catalog in the OIM self-service page, we need to SET IS_REQUESTABLE column to ‘1’ in the database Catalog table.

Query to show Entitlements under OIM self-service catalog page :

Update catalog set is_requestable=1 where entity_display_name='<Name of the entitlement which is not showing under catalog in OIM self-service page>';

Commit;

Query to show Application Instance under OIM self-service catalog page :

Update catalog set is_requestable=1 where entity_display_name='<Name of the App Instance which is not showing under catalog in OIM self-service page>';

Commit;